|
공부하다가 정리한 내용이다.
View 상속

출처 : http://lazineer.tistory.com/90 layout이나
button 같은 UI 관련 클래스들은 모두 View를 상속 받아서 생성된다. 이중에 ViewGroup은 button이나 ImageView같은
것과는 다르게 자식뷰를 가질수 있으면 이를 배치하는 역할을 한다. 자신만의
button 이나 View를 만들고 싶다면 View 클래스를 상속 받아서 필요한 메소드들을 오버라이드 하면된다. 자신만의
Layout을 만들고 싶다면 ViewGroup 클래스를 상속 받아서 필요한 메소드들을 오버라이드 하면된다. Custom View 는 View 클래스를 상속하여 만든다. Custom Layout 은 Viewgroup 클래스를 상속하여 만든다. View 메소드 호출 순서
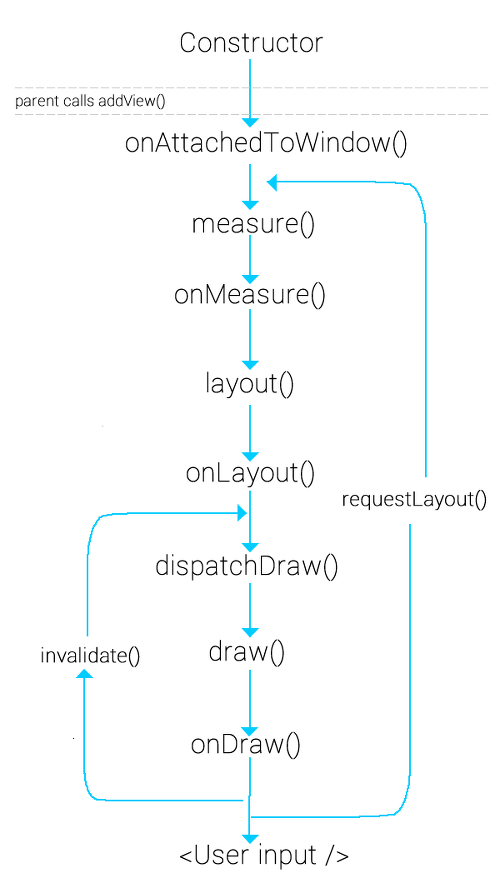
View 오버라이드할 메소드 onMeasure 하는 일 View의 크기를 결정할 때 불리는 함수이다. 함수 호출 과정 View.measure()
-> View.onMeasure() -> View.setMeasuredDimesion() 설명 view 자신의 크기를 지정하는 함수이다. 인자로는 (int
widthMeasureSpec, int heightMeasureSpec) 넓이, 높이 값이 각 모드와 함께 조합된 값이다. 이 값들을 사용하기 위해서는 MeausreSpce의 getMode()와 getSize()를 사용해야 한다. int
widthMode = MeasureSpec.getMode(widthMeasureSpec) int
width = MeasureSpec.getSize(widthMeasureSpec) 이때 Mode는 3가지가 존재한다. MeasureSpec.UNSPECIFIED : 소스상에서 View를 생성했을 때 해당 모드가 넘어 온다. 이 경우 그냥 인자로 넘어온 그대로 사용하면 된다. MeasureSpec.AT_MOST : 이경우는 View 내부의 크기를 계산한 값을 넘겨주면 된다. View의 layout_width,
layout_height가 wrap_content로 설정된 경우 이 모드가 넘어오게 된다. MeasureSpec.getSize()를 통해 나온 값은 View가 최대로 가질수 있는 크기이다. 이를 바탕으로 내부 크기를 계산해야한다. 내부 크기가 이 값보다 크다면 문제가 될 수 있다. MeasureSpec.EXACTLY : 해당 View의 layout_width,
layout_height가 fill_parent나 match_parent일 경우 부모 layout(viewGroup)이 해당 View의 크기를 미리 지정해서 width와 height를 넘겨주므로 MeasureSpec.getSize() 으로 반환된 값을 그냥 사용하면 된다.
onMeasure() 함수 override시 내부에서는 setMeasuredDimesion()함수를 호출해서 자신의 크기를 설정하여야만 합니다.(기본동작은 super.onMeasure()을 호출해라.) setMeasuredDimesion()함수는 자신의 크기를 설정하는 함수로 view의 width,height 값에 상관없이 실제 크기는 이 함수를 통해 지정됩니다. (view 의 width,height은 view의 크기를 권고하는 것입니다. 실제는
setMeasuredDimesion()에 지정한 값으로 크기가 결정됩니다.)
만약 onMeasure()에서 setMeasuredDimesion()을
호출하지 않으면 java.lang.IllegalStateException 예외가 발생합니다.
풀어서 설명 예1 ) 만약 부모가 크기가 width 100, height 200이고 자식의 크기는 width" wrap_content, height : wrap_content 이라면 onMeasure 의 widthMeasureSpec 은 [100,AT_MOST] heightMeasureSpec은 [200,AT_MOST] 가 넘어올 것이다. 부모가 자식에게 말하는 것이다. 너의 내부 컨텐츠의 크기가 너의 크기가 될때 너의 크기는 몇이냐? 근데 너가 최대로 커질수 있는 크기는 100x200이야. 자식은 자신의 내부 컨텐츠 크기를 계산하고 그 크기가 100x200을 넘지 않는다면 그 크기가 자신의 크기가 되는 것이고 내부 컨텐츠가 크기가 100x200을 넘어간다면 자신의 크기는 100x200이 되야 한다. 물론 widthMeasureSpec ,heightMeasureSpec은 부모가 자식에게 권고하는 것이다. 만약 자신의 설정이 wrap_content라도 난 무조건 부모가 지정한 최대크기만큼 커질꺼야하는 자식은 100x200으로 설정하면 된다. 예2) 만약 부모가 크기가 width 100, height 200이고 자식의 크기는 width" fill_content, height :
wrap_content이라면 onMeasure 의
widthMeasureSpec 은
[100,EXACTLY ] heightMeasureSpec은 [200,EXACTLY ] 가 넘어올 것이다. 부모가 자식에게 말하는 것이다. 너는 내가 지정한 100x200이 되어야해. 말 잘듣는 자식이라면 자신의 크기를 100x200으로 지정하면 된다. 하지만 이것또한 권고 일뿐이다. 기능이 다르게 동작하는 자식이라면 알아서 크기를 계산하면 된다. 예3) 만약 부모가 크기가 width 100, height 200이고 자식의 크기는 width: 80, height : 50이라면 onMeasure 의 widthMeasureSpec 은 [80,EXACTLY ] heightMeasureSpec은 [50,EXACTLY ] 가 넘어올 것이다. 자식은 이미 크기가 지정되어 있다는 걸 부모는 안다. 그래서 부모는 자식에게 "넌 내가 지정한 80x50이 되어야해" 라고 말하는 것이다. 만약에 부모 크기가 40x30이라면 자식이 아무리 크기가 80x50으로 설정했다해도 부모는 자식에게 MeasureSpec을
[40,EXACTLY ],[30,EXACTLY ] 로 보낼 것이다. 일반적인 레이아웃은 자식이 부모보다 커질수 없다.
보통 view의 onMeasure() 함수의 동작은 말 잘듣는 자식과 같다. 좀더 말하면 자식의 width, height 속성값이 지정되어 있더라도 이를 결정 짓는 것은 부모이다. 꼭꼭 기억하라.
만약 자식 뷰가 부모 뷰보다 크더라도 자식 뷰는 부모 뷰보다 크게 그려지지 않습니다. 부모 뷰보다 크게 그려지는 부분은 보이지 않게 됩니다. 내부에서 많이 쓰이는 함수 this.measureChild() : 자식 뷰의 크기를 계산시킨다. this.getChildMeasureSpec() : measureChildren()에서 사용하는 하나의 메소드이다. 이 메소드를 통해 특정 자식 view의 MeasureSpce을 만들수 있다. onLayout 하는 일 child view의 위치를 잡아주는 일을 한다. onMeasure 호출 후에 onLayout 이 호출 되므로 자신의 크기를 이미 인지하는 상태에서 위치를 잡아 줄 수 있다. 주의할 점은 이 위치가 장비 디스플레이의 절대적 위치이다. 부모를 기준으로한 상대적인 위치가 아니다.
만약 한 view의 Layout의 크기가 width 100, height 100이고 measure된 크기가 width 20, height이라면 공간은 100x100을 할당하지만 크기는 20x20으로 그려진다. 함수 호출 과정 ViewGroup.layout()->
View.layout() -> View.onLayout() 설명 ViewGroup을 상속하여 layout을 만드는 경우 child view의 위치를 잡아주는 역할을 한다. 넘어 오는 파라미터는 어플리케이션 전체를 기준으로 위치가 넘어오므로 주의해야한다. 내부에서 많이 쓰이는 함수 this.getPaddingLeft() : 자신의 왼쪽 패딩값 this.getPaddingTop() : 자신의 위쪽 패딩값 this.getPaddingRight() : 자신의 오른쪽 패딩값 this.getPaddingBottom() : 자신의 아래쪽 패딩값 this.getMeasuredWidth() : 자신의 크기 계산후 나온 넓이 this.getMeasuredHeight() : 자신의 크기 계산후 나온 높이 getChildCount() : 자식 뷰의 개수를 반환한다. child.measure() : 자식 뷰의 크기를 반환한다. 이 때 MeasureSpec.AT_MOST 로 거의 호출한다. child.getMeasuredWidth() : 자식 뷰의 넓이를 가져온다. child.measure() 호출 후 호출한다. child.getMeasuredHeight() : 자식 뷰의 길이를 가져온다. child.measure() 호출 후 호출한다. child.layout() : 자식 뷰의 위치를 지정한다. onDraw 하는 일 화면을 그리는 일을 한다. 주의할 점은 이때 좌표의 기준은 디스플레이의 절대적인 위치가 아니다. 자신을 기준으로한 좌표이다. 설명 자신을 그리고 자식이 있는 경우 자식들을 그리면 된다. 내부에서 많이 쓰이는 함수 cavans.() : Canvas 의 모든 그리는 함수는 다 사용한다. this.getMeasuredWidth() : view 자신의 넓이를 반환한다. 이를 바탕으로 그리면 된다. this.getMeasuredHeight() : view 자신의 높이를 반환한다. 이를 바탕으로 그리면 된다. 기타 쓰이는 함수 MeasureSpec.makeMeasureSpec : 길이와 모드를 조합하여 measurespec 값을 만든다. 참고사항 padding 과 margin 의 차이 : padding은 내부 여백, margin은 외부 여백
http://clason.tistory.com/321 : 마진(margin) VS 패딩(padding) invalidate()와
requestLayout() 의 차이 : invalidate는 화면이 유효하지 않으니 다시 그리도록 하라는 것이고 requestLayout()은 layout을 갱신하라는 것이다. http://stackoverflow.com/questions/13856180/usage-of-forcelayout-requestlayout-and-invalidate 예제를 통한 Custom View 만들기 예제를 통해 Custom View를 어떻게 만드는지 보겠다. 만들어볼 View 는 MyProgressBar 라는 진행바이다.
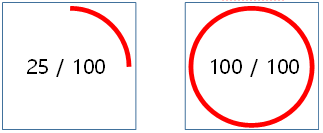
위와 같은 모습의 진행바이다. 최대값을 지정하고 현재값에 따른 백분율에 따라 원을 그리는 진행바이다. 위의 예는 최대값이 100일때 현재값이 25이면 원이 25% 그려지는 상황과 현재값이 최대값일때 원을 그리는 상황이다. Attribute는 원의 색, 최대값, 현재값이다. 그리고 1초마다 가운데 텍스트가 깜빡깜빡거린다. Custom View를 만들기 위해서는
- View 상속
- Attribute 정의
- onDraw 메소드 오버라이드
- Custom Attribute 정의
xml layout을 통해 MyProgressBar에 속성을 조작하기 위해서는 attribute를 우선 정의해야한다. 이 정의는 res/values/attrs.xml 에 정의한다.
|
<resources>
<declare-styleable
name="MyProgressBar">
<attr name="maxValue"
format="integer"/>
<attr name="curValue"
format="integer" />
<attr name="lineColor"
format="color" />
</declare-styleable>
</resources>
|
maxValue : 최대값, 정수 curValue : 현재값, 정수 lineColor : 진행바 색, Color라는 객체를 받을 것 이기 때문에 참조인 color
- MyProgressBar 클래스 생성 및 Attribute 처리하기
|
public class
MyProgressBar extends View {
private int curValue; //현재값 저장
private int maxValue; //최대값 저장
private int lineColor; //진행바 색 저장
public MyProgressBar(Context context) {
super(context);
}
public MyProgressBar(Context context,
AttributeSet attrs) {
super(context, attrs);
TypedArray a =
context.getTheme().obtainStyledAttributes(attrs,R.styleable.MyProgressBar,0,0);
try{
this.curValue =
a.getInteger(R.styleable.MyProgressBar_curValue,0);
this.maxValue = a.getInteger(R.styleable.MyProgressBar_maxValue,100);
this.lineColor =
a.getColor(R.styleable.MyProgressBar_lineColor,0xff000000);
}finally {
}
}
public int getLineColor() {
return lineColor;
}
public void setLineColor(int color) {
this.lineColor = color;
invalidate();
requestLayout();
}
public int getCurValue() {
return curValue;
}
public void setCurValue(int curValue) {
this.curValue = curValue;
invalidate();
requestLayout();
}
public int getMaxValue() {
return maxValue;
}
public void setMaxValue(int maxValue) {
this.maxValue = maxValue;
invalidate();
requestLayout();
}
}
|
View를 상속받은 MyProgressBar를 만든다. xml layout을 통한 속성을 사용하기 위해서는 public
MyProgressBar(Context context, AttributeSet attrs) 를 정의하여야 한다. 클래스는 속성을 저장할 curValue,
maxValue, lineColor 변수를 가진다. 셋다 int 값이다.(color도 int값이다.) 또한 속성값을 조작할 setter, getter 메소드도 만든다. setter의 경우는 속성 값이 바뀌면 view를 다시 그리게 하도록 invalidate();
,requestLayout(); 함수를 호출한다. invalidate()는 view를 다시 그리라는 함수이고 requestLayout()은 크기와 위치를 다시 조정하도록 하는 함수이다.
- onDraw를 통해 그림 그리기
onDraw 함수는 View가 자신을 그리도록 호출되는 함수이다.
|
import
android.content.Context;
import
android.content.res.TypedArray;
import
android.graphics.Canvas;
import
android.graphics.Color;
import
android.graphics.Paint;
import
android.graphics.RectF;
import
android.os.Handler;
import
android.util.AttributeSet;
import
android.view.View;
public class
MyProgressBar extends View {
private int curValue; //현재값 저장
private int maxValue; //최대값 저장
private int lineColor; //진행바 색 저장
public MyProgressBar(Context context) {
super(context);
}
public MyProgressBar(Context context,
AttributeSet attrs) {
super(context, attrs);
TypedArray a =
context.getTheme().obtainStyledAttributes(attrs,R.styleable.MyProgressBar,0,0);
try{
this.curValue =
a.getInteger(R.styleable.MyProgressBar_curValue,50);
this.maxValue =
a.getInteger(R.styleable.MyProgressBar_maxValue,100);
this.lineColor =
a.getColor(R.styleable.MyProgressBar_lineColor,0xff000000);
}finally {
}
}
public int getLineColor() {
return lineColor;
}
public void setLineColor(int color) {
this.lineColor = color;
invalidate();
requestLayout();
}
public int getCurValue() {
return curValue;
}
public void setCurValue(int curValue) {
this.curValue = curValue;
invalidate();
requestLayout();
}
public int getMaxValue() {
return maxValue;
}
public void setMaxValue(int maxValue) {
this.maxValue = maxValue;
invalidate();
requestLayout();
}
Handler
mHandler = new Handler();
@Override
protected
void onDraw(Canvas canvas) {
super.onDraw(canvas);
int
width = this.getMeasuredWidth();
int
height = this.getMeasuredHeight();
//
진행바 그리기 속성
Paint
circle = new Paint();
circle.setColor(this.lineColor);
circle.setStrokeWidth(10);
circle.setAntiAlias(false);
circle.setStyle(Paint.Style.STROKE);
//
진행바 그리기
canvas.drawArc(new
RectF(0,0,width,height),-90,((float)this.curValue/(float)this.maxValue*360),false,circle);
//
텍스트 그리기 속성
Paint
textp = new Paint();
textp.setColor(Color.BLACK);
textp.setTextSize(100);
textp.setTextAlign(Paint.Align.CENTER);
//
짝수초에는 텍스트를 표시하고
홀수초에는 텍스트를 표시하지 않는다.
//
깜빡깜빡거리는 효과
if(System.currentTimeMillis()/1000%2==0) {
// 텍스트 그리기
canvas.drawText(this.curValue + " / " + this.maxValue, width
/ 2, height / 2, textp);
}
//
1초후에 invalidate()호출을 통해 해당 View를 다시 그리게 한다.
//
깜빡깜빡거리는 효과를 위해서 아래 코드
사용
mHandler.postDelayed(new Runnable() {
@Override
public void run() {
invalidate();
}
},1000);
}
}
|
canvas의 좌표는 View를 기준으로하는 좌표이다.(어플리케이션 절대좌표가 아니다.) 그리고 canvas 영역(view영역) 밖으로는 그림을 그려도 표시되지 않는다. 1초후에 깜빡깜빡 거리도록 System.currentTimeMillis() 로 시간을 가져오고 짝수초에는 텍스트를 표시하고 홀수초에는 텍스트를 표시하지 않게 하였다. 그리고
handler.postDelayed() 함수를 통해 1초후 invalidate()함수가 호출되고 View는 자기자신을 다시 그리게 된다. 예제
테스트 실제로 MyProgressBar를 layout에 추가하고 동작하는지 확인해 보겠다.
|
<?xml
version="1.0" encoding="utf-8"?>
<RelativeLayout
xmlns:android="http://schemas.android.com/apk/res/android"
xmlns:tools="http://schemas.android.com/tools"
xmlns:custom="http://schemas.android.com/apk/res-auto"
android:layout_width="match_parent"
android:layout_height="match_parent"
android:paddingBottom="@dimen/activity_vertical_margin"
android:paddingLeft="@dimen/activity_horizontal_margin"
android:paddingRight="@dimen/activity_horizontal_margin"
android:paddingTop="@dimen/activity_vertical_margin"
tools:context="com.example.shh.test004_myprogressbar.MainActivity"
>
<com.example.shh.test004_myprogressbar.MyProgressBar
android:layout_width="300dp"
android:layout_height="300dp"
custom:curValue="25"
custom:maxValue="100"
custom:lineColor="@color/colorPrimaryDark"
/>
</RelativeLayout>
|
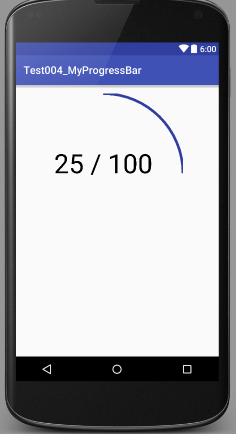
이쁘지는 않지만 얼추 모양은 나왔다. 사진을 올릴 수는 없지만 가운데 텍스트는 깜빡깜빡거린다.. View에 외곽 사각형을 그린다는 걸 깜빡했다.;; 예제
코드
 Test004_MyProgressBar.zip Test004_MyProgressBar.zip
핵심
내용
- View를 상속 받아 사용할때는 onLayout(),
onMeasure() 은 오버라이드 하지 않아도 된다.(View클래스는 크기와 위치에 대한 행동이 기본적으로 정의되어있다.)
- xml 을 통해 속성을 정의하는 방법과 사용방법
- onDraw()를 통해 그리는 방법
- 깜빡깜빡하는 거와 같은 계속적인 애니메이션을 Handler와
invalidate()를 통해 하는 방법
예제를 통한 Custom Layout
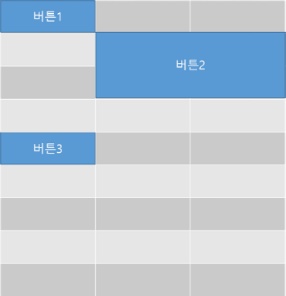
예제는 위와 같이 레이아웃을 만들어 볼 것이다. MyLayout 이라고 명명하겠다. MyLayout은 row, column 라는 속성이이 있다. 위에와 같은 상태라면 3x9 이다. row는 3, column 은 9이다. 그리고 내부에 들어가는 view(예를 들어 버튼)은 MyLayout의 속성인 rowSize,
columnSize, rowPosition, columnPosition 의 값을 사용하여 크기와 위치를 조정하겠다. 버튼 1은 rowSize= 1, columnSize=1, rowPosition = 0, columnPosition = 0 버튼 2은 rowSize = 2, columnSize=2, rowPosition = 1, columnPosition = 1 버튼 3은 rowSize = 1, columnSize=1, rowPosition = 4, columnPosition = 0 이다. 이 예제는 WPF의 Grid가 갑자기 떠올라서 비슷하게 만들게 되었다.
- Custom Attribute 정의
xml layout을 통해 MyProgressBar에 속성을 조작하기 위해서는 attribute를 우선 정의해야한다. 이 정의는 res/values/attrs.xml 에 정의한다.
|
<resources>
<declare-styleable
name="MyLayout">
<attr name="rowSize" format="integer"/>
<attr name="columnSize" format="integer"
/>
<attr name="rowPosition" format="integer"
/>
<attr name="columnPosition"
format="integer" />
</declare-styleable>
</resources>
|
rowSize: layout 행 개수 columnSize: layout 열 개수 rowPosition: 자식 뷰가 MyLayout에 위치할 위치 columnPostion : 자식 뷰가 MyLayout에 위치할 위치
- MyLayout 클래스 생성 및 Attribute 처리하기
실제 처리할 속성은 rowSize와 columnSize이다. 의문점이 있을 것이다. 왜 rowPosition과 columnPosition 은 처리하지 않는 것일까? rowPosition과
columnPosition은 MyLayout에서 정의한 속성이지만 실제로는 자식뷰에서 사용할 속성이다. rowPosition과 columnPosition을 정의하지 않은 어떠한 view라도 이 속성값들을 가질수는 있다. MyLayout은 자식 view 에 설정된 rowPosition과 columnPosition을 보고 위치를 설정할 것이다. C#의 의존 속성과 비슷한 개념이다. 우선 클래스 생성 후
- public
MyLayout(Context context)
- public
MyLayout(Context context, AttributeSet attrs)
- protected void
onLayout(boolean changed, int l, int t, int r, int b)
이 3개는 필수로 Override 해야한다. 그리고 MyLayout의 자식 view에 MyLayout 속성(rowPosition, columnPosition)을 가져올 수 있도록 하기 위해
- LayoutParams
를 inner
class로 만들어야 한다.
- public LayoutParams
generateLayoutParams(AttributeSet attrs)
- protected
LayoutParams generateDefaultLayoutParams() 를 Override
- protected
ViewGroup.LayoutParams generateLayoutParams 를 Override
- protected
boolean checkLayoutParams(ViewGroup.LayoutParams p) 를 Override
이렇게 하면 레이아웃 파라미터에 사용자 정의 속성을 가져올 수 있다.
|
public
class MyLayout extends ViewGroup{
private int rowSize;
private int columnSize;
public MyLayout(Context context) {
super(context);
}
public MyLayout(Context context,
AttributeSet attrs) {
super(context, attrs);
TypedArray
a=context.obtainStyledAttributes(attrs,R.styleable.MyLayout,0,0);
try{
this.rowSize =a.getInteger(R.styleable.MyLayout_rowSize,1);
this.columnSize =a.getInteger(R.styleable.MyLayout_rowSize,1);
}finally {
a.recycle();
}
}
@Override
protected void onLayout(boolean changed,
int l, int t, int r, int b) {
}
/**
* 자식 view
에 사용자 정의 레이아웃 파라미터를 정의하고 얻기위한 것이다.
*
* */
@Override
public
LayoutParams generateLayoutParams(AttributeSet attrs) {
return
new MyLayout.LayoutParams(getContext(), attrs);
}
@Override
protected
LayoutParams generateDefaultLayoutParams() {
return
new LayoutParams(LayoutParams.MATCH_PARENT, LayoutParams.MATCH_PARENT);
}
@Override
protected
ViewGroup.LayoutParams generateLayoutParams(ViewGroup.LayoutParams p) {
return
new LayoutParams(p);
}
@Override
protected
boolean checkLayoutParams(ViewGroup.LayoutParams p) {
return
p instanceof LayoutParams;
}
/**
* 자식 view 당 사용자 정의 레이아웃 정보
* 이것으로 자식 view에 사용자가 정의한 속성값을 얻을 수 있다.
*/
public
static class LayoutParams extends MarginLayoutParams {
public
int rowPosition ;
public
int columnPosition ;
public
LayoutParams(Context c, AttributeSet attrs) {
super(c, attrs);
//
Pull the layout param values from the layout XML during
//
inflation. This is not needed if you
don't care about
//
changing the layout behavior in XML.
TypedArray a = c.obtainStyledAttributes(attrs, R.styleable.MyLayout);
try {
rowPosition = a.getInt(R.styleable.MyLayout_rowPosition, 0);
columnPosition = a.getInt(R.styleable.MyLayout_columnPosition, 0);
}finally {
a.recycle();
}
}
public
LayoutParams(int width, int height) {
super(width, height);
}
public
LayoutParams(ViewGroup.LayoutParams source) {
super(source);
}
}
}
|
위 코드를 보면 LayoutParams 를 위한 코드가 중요하다. 이를 통해 알 수 있는 것은 사용자가 정의한 레이아웃의 자식뷰들은 부모가 정의한 속성을 설정하고 얻을 수 있다는 것이다. MyLayout으로 예를 들자면 자식뷰들은 rowPosition에 대해서 속성이 정의 되어 있지 않아도 부모가 정의한 rowPosition을 사용할 수 있고 부모는 자신이 만든 LayoutParams을 자식뷰에게 전달하므로 부모는 자식에 사용된 rowPosition값을 얻을 수 있다.
- onMeasure, onLayout 처리
|
@Override
protected void onMeasure(int
widthMeasureSpec, int heightMeasureSpec) {
super.onMeasure(widthMeasureSpec,
heightMeasureSpec);
int maxWidth =
MeasureSpec.getSize(widthMeasureSpec);
int maxHeight =
MeasureSpec.getSize(heightMeasureSpec);
double cellWidth=
maxWidth/this.columnSize;
double cellHeight=
maxHeight/this.rowSize;
final int count = getChildCount();
for (int i = 0; i < count; i++) {
final View child = getChildAt(i);
final LayoutParams lp =
(LayoutParams)child.getLayoutParams();
/*자식뷰 크기지정*/
/*고정크기로 설정하기 위해 MeasureSpec.EXACTLY 사용 */
child.measure(MeasureSpec.makeMeasureSpec((int)(cellWidth*lp.columnSize),MeasureSpec.EXACTLY)
,MeasureSpec.makeMeasureSpec((int)(cellHeight*lp.rowSize),MeasureSpec.EXACTLY));
}
setMeasuredDimension(maxWidth,maxHeight);
}
@Override
protected void onLayout(boolean changed,
int l, int t, int r, int b) {
int maxWidth = getMeasuredWidth();
int maxHeight = getMeasuredHeight();
double cellWidth=
maxWidth/this.columnSize;
double cellHeight=
maxHeight/this.rowSize;
final int count = getChildCount();
for (int i = 0; i < count; i++) {
final View child = getChildAt(i);
final LayoutParams lp =
(LayoutParams)child.getLayoutParams();
int cl =
(int)(cellWidth*lp.columnPosition);
int ct =
(int)(cellHeight*lp.rowPosition);
int cr = (int)(cl + cellWidth *
lp.columnSize);
int cb = (int)(ct + cellHeight *
lp.rowSize);
/*자식뷰
위치지정*/
child.layout(cl,ct,cr,cb);
}
|
예제
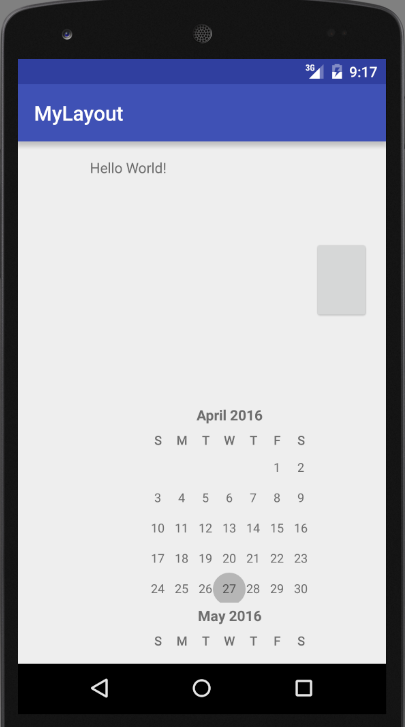
테스트 테스트1
|
<?xml
version="1.0" encoding="utf-8"?>
<RelativeLayout
xmlns:android="http://schemas.android.com/apk/res/android"
xmlns:tools="http://schemas.android.com/tools"
android:layout_width="match_parent"
android:layout_height="match_parent"
android:paddingBottom="@dimen/activity_vertical_margin"
android:paddingLeft="@dimen/activity_horizontal_margin"
android:paddingRight="@dimen/activity_horizontal_margin"
android:paddingTop="@dimen/activity_vertical_margin"
tools:context="com.example.shh.mylayout.MainActivity"
>
<com.example.shh.mylayout.MyLayout
android:layout_width="fill_parent"
android:layout_height="fill_parent"
xmlns:custom="http://schemas.android.com/apk/res-auto"
custom:rowSize="6"
custom:columnSize="6" >
<TextView
android:layout_width="wrap_content"
android:layout_height="wrap_content"
android:text="Hello
World!"
custom:rowSize="1"
custom:columnSize="2"
custom:columnPosition="1"
custom:rowPosition="0"
/>
<Button
android:layout_width="wrap_content"
android:layout_height="wrap_content"
custom:rowSize="1"
custom:columnSize="1"
custom:columnPosition="5"
custom:rowPosition="1"
/>
<CalendarView
android:layout_width="match_parent"
android:layout_height="match_parent"
custom:rowSize="3"
custom:columnSize="3"
custom:columnPosition="2"
custom:rowPosition="3"
>
</CalendarView>
</com.example.shh.mylayout.MyLayout>
</RelativeLayout>
|
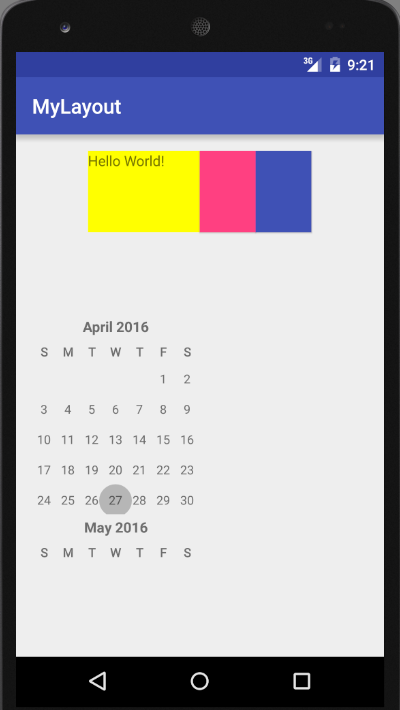
테스트2
|
<?xml
version="1.0" encoding="utf-8"?>
<RelativeLayout
xmlns:android="http://schemas.android.com/apk/res/android"
xmlns:tools="http://schemas.android.com/tools"
android:layout_width="match_parent"
android:layout_height="match_parent"
android:paddingBottom="@dimen/activity_vertical_margin"
android:paddingLeft="@dimen/activity_horizontal_margin"
android:paddingRight="@dimen/activity_horizontal_margin"
android:paddingTop="@dimen/activity_vertical_margin"
tools:context="com.example.shh.mylayout.MainActivity"
>
<com.example.shh.mylayout.MyLayout
android:layout_width="match_parent"
android:layout_height="match_parent"
xmlns:custom="http://schemas.android.com/apk/res-auto"
custom:rowSize="6"
custom:columnSize="6" >
<TextView
android:layout_width="wrap_content"
android:layout_height="wrap_content"
android:text="Hello
World!"
android:background="#ffff00"
custom:rowSize="1"
custom:columnSize="2"
custom:columnPosition="1"
custom:rowPosition="0"
/>
<Button
android:layout_width="wrap_content"
android:layout_height="wrap_content"
android:background="@color/colorAccent"
custom:rowSize="1"
custom:columnSize="1"
custom:columnPosition="3"
custom:rowPosition="0"
/>
<Button
android:layout_width="wrap_content"
android:layout_height="wrap_content"
android:background="@color/colorPrimary"
custom:rowSize="1"
custom:columnSize="1"
custom:columnPosition="4"
custom:rowPosition="0"
/>
<CalendarView
android:layout_width="match_parent"
android:layout_height="match_parent"
custom:rowSize="3"
custom:columnSize="3"
custom:columnPosition="0"
custom:rowPosition="2"
>
</CalendarView>
</com.example.shh.mylayout.MyLayout>
</RelativeLayout>
|
예제
코드
MyLayout.zip
핵심
내용
- layout의 custom attribute를 자식뷰에 설정하고 그 값을 얻기 위해서는
- LayoutParams
를 inner
class로 만들어야 한다.
- public LayoutParams
generateLayoutParams(AttributeSet attrs)
- protected
LayoutParams generateDefaultLayoutParams() 를 Override
- protected
ViewGroup.LayoutParams generateLayoutParams 를 Override
- protected
boolean checkLayoutParams(ViewGroup.LayoutParams p) 를 Override
- onMeasure() , onLayout() 를 구현해야한다.
- 필요하다면 onDraw() 도 구현해야한다.
드디어 Custom Layout도 올렸습니다. 귀차니즘 때문인지 코드와 설명에 배려가 부족합니다. 이해해주세요
출처: http://onecellboy.tistory.com/344 [신불사 - 신현호라 불리는 사나이] |


