|
텍스쳐 적용하기 - 2D Texture 아마도 이글을 읽는 분들의 경우, 기본적으로 OpenGL 또는 OpenGL ES 1.x에서 텍스쳐 구현을 해보셨을 것이라 생각 됩니다. OpenGL 책을 사면 텍스쳐에 대한 설명은 필수 적이기 때문에 관련 책을 읽어 보는 것을 추천합니다. 바른생활님의 설명하신 "[iOS GLView 만들기]13. Texturing" 장에서도 설명이 잘 되어 있습니다. All about OpenGL ES 2.x – (part 2/3) (http://db-in.com/blog/2011/02/all-about-opengl-es-2-x-part-23/) 여기서는 OpenGL ES 2.0에서 2D Texture 을 사용하기 위해서는 어떻게 처리해야 하는지에 대해서 좀더 집중하도록 하겠습니다. 1. Texture 그리기전 준비사항 텍스쳐의 종류에는 2D Texture, Multi Texture, Cubemap Texture, Bumpmap Texture 등등 다양한 방식이 있습니다. (3D Texture도 있지만 이는 GL_TEXTURE_3D_OES 인 extension 임으로 생략...) 일반적으로 가장 많이 사용하는 2D Texture에 대해서 알아 보도록 하겠습니다. 텍스쳐를 그리기 위해서는 일차적으로는 해당 이미지 파일을 로딩한 후 buffer array로 변경해야 하며, 그 다음에는 Texture ID를 생성 한후 이 ID에 buffer array를 저장해야 합니다. 텍스쳐 ID 생성 및 이미지 RGBA 버퍼 저장
GLuint RenderingEngine::createTexture(const string& file, bool bPot, int wrapMode) { GLuint tex; glGenTextures(1, &tex); glBindTexture(GL_TEXTURE_2D, tex);
loadImage(m_resourceManager->LoadImage(file));
GLenum minFilter = (bPot ? GL_LINEAR : GL_LINEAR_MIPMAP_LINEAR); glTexParameteri(GL_TEXTURE_2D, GL_TEXTURE_MIN_FILTER, minFilter); glTexParameteri(GL_TEXTURE_2D, GL_TEXTURE_MAG_FILTER, GL_LINEAR);
if (bPot) { if (wrapMode == 1) { glTexParameteri(GL_TEXTURE_2D, GL_TEXTURE_WRAP_S, GL_CLAMP_TO_EDGE); glTexParameteri(GL_TEXTURE_2D, GL_TEXTURE_WRAP_T, GL_CLAMP_TO_EDGE); } else { glTexParameteri(GL_TEXTURE_2D, GL_TEXTURE_WRAP_S, GL_REPEAT); glTexParameteri(GL_TEXTURE_2D, GL_TEXTURE_WRAP_T, GL_REPEAT); } } else { //glTexParameteri(GL_TEXTURE_2D, GL_GENERATE_MIPMAP, GL_TRUE); glGenerateMipmap(GL_TEXTURE_2D); } return tex; } ---------------------------------------------------------- 코드의 구성은 OpenGL ES 1.x와 유사합니다.
(1) glGenTexture() 함수를 이용해서 Texture ID를 생성하고, (2) glBindTexture() 함수를 이용해서 생성한 Texture ID를 방인딩하고, (3) glTexImage2D() 함수를 이용해서 "16장 " 에서 얻은 RGBA byte array을 저장하고, (4) glTexParameteri() 함수를 이용해서 축소필터 GL_TEXTURE_MIN_FILTER 과 확대 필터 GL_TEXTURE_MAG_FILTER 를 설정할 수 있습니다. (5) glTexParameteri() 함수를 이용해서 GL_TEXTURE_WRAP_S, GL_TEXTURE_WRAP_T 를 이용해서 Vertex 점정의 경계 지점을 부드럽게 보간 시켜주는 GL_CLAMP_TO_EDGE 와 텍스쳐를 계속 반복 시킬 GL_REPEAT를 설정할 수 있습니다. 밉맵을 사용할 경우에는 glGenerateMipmap(GL_TEXTURE_2D) 를 이용해 주고요
축소 / 확대 필터
GL_NEAREST : 인접 축소 필터로, 가장 근접한 텍셀이 색상을 사용한다. 단순하고 거칠게 표현된다. glTexParameteri(GL_TEXTURE_2D, GL_TEXTURE_MIN_FILTER, GL_NEAREST);
glTexParameteri(GL_TEXTURE_2D, GL_TEXTURE_MAG_FILTER, GL_NEAREST); GL_LINEAR : 양방향 선형(bilinear) 필터링 알고리즘으로, 텍셀에서 인접한 2x2 점을 샘플링하여 가중치 평균값을 구한다. glTexParameteri(GL_TEXTURE_2D, GL_TEXTURE_MIN_FILTER, GL_LINEAR);
glTexParameteri(GL_TEXTURE_2D, GL_TEXTURE_MAG_FILTER, GL_LINEAR); GL_LINEAR_MIPMAP_LINEAR : 삼중 선형(TRILINEAR) 필터링으로 가장 근접한 밉맵 두개를 찾아서 각각 GL_LINEAR 필터링한한 결과 값을 섞는다. OpenGL은 이 필터링을 위해서 8개의 샘플을 추출하므로, 가장 높은 품질의 값을 생성하는 필터이다. glTexParameteri(GL_TEXTURE_2D, GL_TEXTURE_MIN_FILTER, GL_LINEAR_MIPMAP_LINEAR); glTexParameteri(GL_TEXTURE_2D, GL_TEXTURE_MAG_FILTER, GL_LINEAR); 밉맵은 축소필터에만 영향을 미치며, OpenGL ES 2.0에서 사용할 경우에는 자동 밉맵 함수인 glGenerateMipmap(GL_TEXTURE_2D); 이용해서 처리 가능하다.
이제 Texture ID를 생성하였음으로, 생성한 Texture ID를 이용해서 화면에 어떻게 렌더링 하는지에 대해서 알아보도록 하겠습니다.
2. 2D Texture
앞장까지의 강좌에서는 Vertex Coordination(정점 좌표)와 Normal Coordination(법선 좌표)를 다뤘었습니다. 정점 좌표를 이용해서 삼각형, 큐브, 원뿔, 구, 뫼뷔우스 띠 등과 같은 Geometry(기하)를 그렸으며, 법선 좌표를 이용해서 삼각형의 각 면등에 조명(Light) 효과를 보여줬었습니다. 마찬가지로 텍스쳐를 Geometry에 표현하기 위해서는 텍스쳐 좌표가 필요합니다. (텍스쳐 좌표를 Texture Element라 부르며 짧게 텍셀(texel)이라고 합니다.) OpenGL에서 texel은 기존 pixel과 다릅니다. 다음의 그림을 보시면, 픽셀은 Left-Top이 원점(base point)입니다. 하지만, Open GL에서의 원점은 Left-Bottom 입니다. (원점을 Anchor point 라고도 부르기도 합니다.) 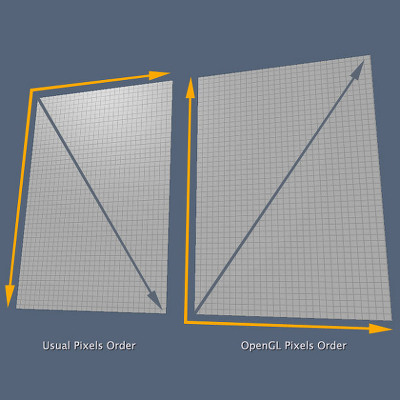
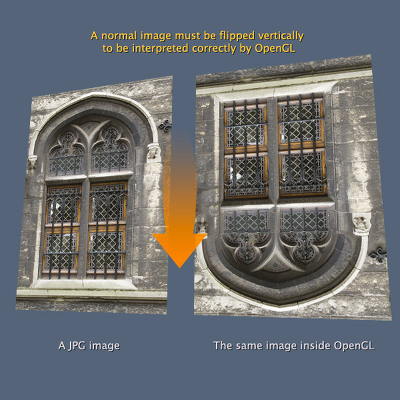
상자와 에디 이미지를 예로 들어 보면 정상(normal) 이미지(pixel 순서)의 경우 왼쪽과 같으며, 이 이미지를 OpenGL에 저장하면, 오른쪽과 같이 뒤집혀서 들어가기 때문에 OpenGL로 화면을 그리면 뒤집혀 있게 됩니다. 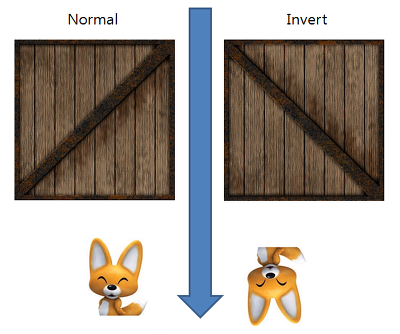
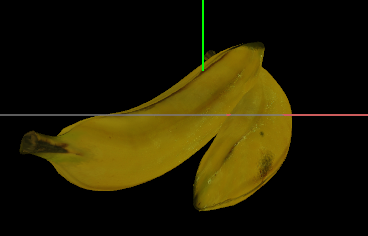
해결 방법은 여러가지가 있습니다. (1) 이미지 자체를 수직(세로) 방향으로 뒤집어서 저장해 둔다. (2) 이미지를 읽은 후 Affine coordination(아핀 좌표계) 를 api 등을 이용해서 뒤집어서 OpenGL에 전달한다. (3) OpenGL에서 이용할 texel의 y 좌표에 -1.0f 를 곱해 줌으로서 항상 뒤집어 지게 한다. (4) Vertex Shader에서 vertex position에 해당하는 값("gl_Vertex.y" to "a_position.y")에 -1.0f를 곱해 줌으로서 항상 뒤집어 지게 한다. ("a_position"은 제가 이용하는 attribute vec4 a_position; 변수로서 변수명은 바꿔서 사용해도 됩니다. ^^;) ----------------------------- 여기서 주의할 점은 (3)번과 (4)번의 경우 Render To Texture를 이용해서 화면을 표현해 줄때 RTT한 이미지가 Left-Top으로 그려진 상태에서 텍셀의 y축에 음수가 곱해져서 Left-Bottom 순서로 다시 뒤집어지는 문제가 발생할 수도 있음으로, 제 개인적인 의견으로는 (1)번과 (2)번 방법이 적당할 것 같습니다. 3. Draw Banana 이제 바나나를 기준으로 실제 Shader을 이용해서 Texture Rendering 하는 부분에 대해서 보겠습니다. 렌더링의 절차를 그림으로 표현하면 다음과 같습니다. 
(소스코드 분석에 앞서서 다음 장에서 다룰 MultiTexture와 혼합되어 있기 때문에 일반적인 방법과는 좀 다를 수 있습니다.) Classes/RenderingEngine.CH03.ES20.cpp 렌더링 하기전 초기화 부분 정리 void RenderingEngine::Initialize(const vector<ISurface*>& surfaces) { ... m_textures.BANANA = createTexture(TextureFiles[BANANA], true); // ---- (1) // Initialize OpenGL ES STATE
Initialize(width, height); // ------------------- (4)
... } // ------------------- (2) GLuint RenderingEngine::createTexture(const string& file, bool bPot, int wrapMode)
{
GLuint tex;
glGenTextures(1, &tex);
glBindTexture(GL_TEXTURE_2D, tex); loadImage(m_resourceManager->LoadImage(file)); // ------------------- (3) GLenum minFilter = (bPot ? GL_LINEAR : GL_LINEAR_MIPMAP_LINEAR);
glTexParameteri(GL_TEXTURE_2D, GL_TEXTURE_MIN_FILTER, minFilter);
glTexParameteri(GL_TEXTURE_2D, GL_TEXTURE_MAG_FILTER, GL_LINEAR); if (bPot) {
if (wrapMode == 1) {
glTexParameteri(GL_TEXTURE_2D, GL_TEXTURE_WRAP_S, GL_CLAMP_TO_EDGE);
glTexParameteri(GL_TEXTURE_2D, GL_TEXTURE_WRAP_T, GL_CLAMP_TO_EDGE);
} else {
glTexParameteri(GL_TEXTURE_2D, GL_TEXTURE_WRAP_S, GL_REPEAT);
glTexParameteri(GL_TEXTURE_2D, GL_TEXTURE_WRAP_T, GL_REPEAT);
}
} else {
//glTexParameteri(GL_TEXTURE_2D, GL_GENERATE_MIPMAP, GL_TRUE);
glGenerateMipmap(GL_TEXTURE_2D);
} return tex;
} ------------------------------------------------------ (1) : 바나나 텍스쳐 생성 createTexture() 함수를 이용해서 "banana.jpg" 파일을 읽은 후 Texture ID를 생성합니다. 이 생성한 Texture ID로 바나나를 3D로 렌더링 하기 전에 glBindTexture(GL_TEXTURE_2D, tex_id) 를 해주면 됩니다. (렌더링 하기 전이란.. glDrawArrays나 glDrawElements 를 호출하기 전 이라고 보면 될것 같습니다.)
(2) : createTexture() 함수 위에서도 설명했었지만 텍스쳐 파일을 로딩한 후 Texture ID를 생성하는 함수 입니다. 주의할 실 점은 바른생활님 블로그에도 언급되었다 싶이, 밉맵 사용시에는 이미지 파일을 로딩한 후 OpenGL에 저장하는 함수인 glTexImage2D() 함수 처리를 앞에서 먼저 해 줘야 정상적으로 동작합니다. (3) : loadImage() 함수 파일을 로딩하고 array buffer를 glTexImage2D()함수를 이용해서 OpenGL에 저장하는 역활을 합니다. (4) : Initialize() 함수 OpenGL ES20과 관련한 VERTEX SHADER, FRAGMENT SHADER STATE를 초기화는 부분입니다. 이전 장과 다른 점은 texture를 사용할 것임으로 다음과 같이 두가지가 추가 됩니다. VERTEX SHADER에 선언된 texel 과 관련한 attribute 형인 "attribute vec2 a_textureCoordIn;"와 연결되는 m_pixelLight.Attributes.TextureCoord = glGetAttribLocation(program, "a_textureCoordIn"); 부분과 FRAGMENT SHADER에 선언된 sampler2D 형인 "uniform sampler2D Sampler0;"와 연결되는 glUniform1i(m_pixelLight.Uniforms.Sampler0, 0); 를 추가 되었습니다. (Texture를 다룰 때 sampler2D형인 Sampler0에 0값으로 초기화 해주지 않는 책이나 코드가 간혹 있습니다. Single Texture일 경우에는 0으로 초기화 해주지 않아도 정상적으로 동작은 합니다. 하지만 Multi Texture 까지 고려해서 프로그램을 짤 것임으로 Sampler0에는 0으로 초기화 해주는 것이 좋습니다.) Classes/RenderingEngine.CH03.ES20.cpp 렌더링 부분 정리 void RenderingEngine::Render(const vector<Visual>& visuals) { ... // PixelLight
bool bIsPixelLight = true; // ---- (1)
ProgramHandles handler;
handler = m_pixelLight;
glUseProgram(handler.Program); // Initialize various state. glEnableVertexAttribArray(handler.Attributes.Position); glEnableVertexAttribArray(handler.Attributes.Normal); glEnableVertexAttribArray(handler.Attributes.TextureCoord); // ---- (2) ... // Set the Texture Mode
if (bIsPixelLight) {
glActiveTexture(GL_TEXTURE0 + TEXTURE_0);
if (visualIndex == 9) {
glBindTexture(GL_TEXTURE_2D, m_textures.BANANA); // --------- (3)
glUniform1i(handler.Uniforms.Sampler0, TEXTURE_0);
} else {
glBindTexture(GL_TEXTURE_2D, m_textures.CRATE);
glUniform1i(handler.Uniforms.Sampler0, TEXTURE_0);
}
} ... // Draw the surface. int stride = 2 * sizeof(vec3) + sizeof(vec2); // --------- (4)
GLvoid* offset = (GLvoid*) sizeof(vec3); // --------- (5)
GLint position = handler.Attributes.Position;
GLint normal = handler.Attributes.Normal;
GLint texture = handler.Attributes.TextureCoord; // --------- (6) vec4 white(1, 1, 1, 1);
if (drawable.IndexCount < 0) {
glBindBuffer(GL_ARRAY_BUFFER, drawable.VertexBuffer);
glVertexAttribPointer(position, 3, GL_FLOAT, GL_FALSE, stride, 0);
glVertexAttribPointer(normal, 3, GL_FLOAT, GL_FALSE, stride, offset);
offset = (GLvoid*) (sizeof(vec3) * 2); // --------- (7)
glVertexAttribPointer(texture, 2, GL_FLOAT, GL_FALSE, stride, offset); // --------- (8)
glDrawArrays(GL_TRIANGLES, 0, drawable.VertexCount); // --------- (9) } else { // --------- (10)
glBindBuffer(GL_ARRAY_BUFFER, drawable.VertexBuffer);
glVertexAttribPointer(position, 3, GL_FLOAT, GL_FALSE, stride, 0);
glVertexAttribPointer(normal, 3, GL_FLOAT, GL_FALSE, stride, offset);
offset = (GLvoid*) (sizeof(vec3) * 2);
glVertexAttribPointer(texture, 2, GL_FLOAT, GL_FALSE, stride, offset);
glBindBuffer(GL_ELEMENT_ARRAY_BUFFER, drawable.IndexBuffer);
glDrawElements(GL_TRIANGLES, drawable.IndexCount, GL_UNSIGNED_SHORT, 0); } glDisableVertexAttribArray(handler.Attributes.Position);
glDisableVertexAttribArray(handler.Attributes.Normal);
glDisableVertexAttribArray(handler.Attributes.TextureCoord); // --------- (11) // VBO을 UnBind 해야 VBA와 충돌이 없다. // --------- (12)
glBindBuffer(GL_ARRAY_BUFFER, 0);
glBindBuffer(GL_ELEMENT_ARRAY_BUFFER, 0); /* Flush all drawings */
glFinish(); error = checkGLError();
if (!m_spinning) {
xrot += xspeed; /* Add xspeed To xrot */
yrot += yspeed; /* Add yspeed To yrot */
} glBindTexture(GL_TEXTURE_2D, 0); // --------- (13)
glUseProgram(0); // --------- (14) } ------------------------------------------------------ (1) : bIsPixelLight 변수 설정합니다. bool bIsPixelLight = true; handler = m_pixelLight;
glUseProgram(handler.Program); (2) Texture Coordination Array 를 활성화 해줍니다. "glEnableVertexAttribArray(handler.Attributes.TextureCoord);" 기존 GLES1.1 기준으로는 "glEnableClientState(GL_TEXTURE_COORD_ARRAY);" 함수를 대체하는 부분입니다. 활성화와 반대되는 비 활성화는 (11)번 함수" glDisableVertexAttribArray(handler.Attributes.TextureCoord);"가 쌍으로 있어야 합니다. (3) Banana texture id를 바인딩 해줍니다. 생성한 텍스쳐를 3D 렌더링 객체에 적용하기 위해서는 해당 texture id를 바인딩 해줘야 합니다. glBindTexture(GL_TEXTURE_2D, m_textures.BANANA);
glUniform1i(handler.Uniforms.Sampler0, TEXTURE_0);
(Sampler0에 대해서 0번으로 재 설정 해주는 부분은 없어도 상관은 없지만, 명시적 표현으로 나뒀습니다.) (간혹 Shader에 정의된 sampler2d 변수에 glGenTexture() 함수를 이용해서 생성한 texture id에 -1를 한 후 넣어주는 코드가 있는 경우가 있습니다. 이는 glGen()시에 처음 생성된 ID가 1이기 때문에 그렇게 하는 경우입니다. 문제는 Galaxy Tab과 같은 PowerVR GPU의 경우, 처음 생성시 1이 아닌 3xxxxx 번 등과 같은 높은 숫자가 나오는 경우가 있습니다. 그럼으로 명시적으로 그냥 첫 번째 sampler2d 변수에는 0을 두 번째는 1를 넣어주는 것이 좋을 것 같습니다.) (4) Vertex, Normal, Texture coord 에 대한 memory chunk 영역을 설정 해 줍니다. banana.obj를 해석한 후 Vertex Buffer Object(VBO)에 저장해 놓았음으로, OpenGL에게 메모리가 한 묶음에 해당하는 크기를 알려줘야 합니다. 이 역할을 하는 부분이 stride 입니다. int stride = 2 * sizeof(vec3) + sizeof(vec2); "VertexCoord(12) + NormalCoord(12) + TextureCoord(8) = 32" 가 됩니다. OpenGL ES 2.0 Programming Guide 책에서는 이부분을 Array Of Structures(Page 104) 라고 표현 합니다. 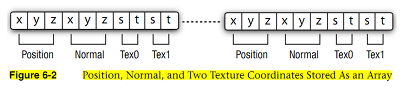
(5) Array Of Structures 에서 Normal Coord에 대한 offset 을 설정 합니다. GLvoid* offset = (GLvoid*) sizeof(vec3); VertexCoord 에 대한 크기 만큼 이동시켜줄 것임으로 12 bytes 입니다. 전달은 GLvoid* 형태로 캐스팅해서 주소로 넘겨 줍니다. (6) VERTEX SHADER내의 Texture Attrbute와 연결된 ID 입니다. GLint texture = handler.Attributes.TextureCoord; PixelLighting.vert 내에 선언된 "a_attribute vec2 a_textureCoordIn;" 연결 가능한 Attribute ID 입니다. 이 ID를 이용해서 (8)번 항목에서 Vertex Attribute Pointer 등록 시 사용하게 됩니다. (7) Array Of Structures 에서 Texture Coord에 대한 offset 을 설정 합니다. offset = (GLvoid*) (sizeof(vec3) * 2); VertexCoord 와 NormalCoord에 대한 크기 만큼 이동시켜줄 것임으로 24 bytes 입니다. 전달은 GLvoid* 형태로 캐스팅해서 주소로 넘겨 줍니다. (8) 텍셀 정보를 저장 합니다. 텍셀 좌표에 대한 정보를 "glVertexAttribPointer(texture, 2, GL_FLOAT, GL_FALSE, stride, offset);" 함수를 이용해서 저장합니다. 기존 GLES1.1 기준으로는 "glTexCoordPointer(2, GL_FLOAT, 0, texcoords);"함수를 대체하는 부분입니다. (9) Vertices 방식으로 렌더링을 합니다. glDrawArrays(GL_TRIANGLES, 0, drawable.VertexCount); banana.obj는 glDrawArray 방식으로 표출되게금 header 형태로 만들었기 때문에 이 부분에서 그려지게 됩니다. (10) Indices 방식으로 렌더링을 합니다. glDrawElements(GL_TRIANGLES, drawable.IndexCount, GL_UNSIGNED_SHORT, 0); ParametricSurface 로 만들어진 Geometry 들은 Indices 로 만들어 졌음으로 이 부분에서 그려지게 됩니다. (11) Texture Coordination Array 를 비 활성화 해줍니다. "glDisableVertexAttribArray(handler.Attributes.TextureCoord);" 함수는 기존 GLES1.1 기준으로는 "glDisableClientState(GL_TEXTURE_COORD_ARRAY);" 함수를 대체하는 부분입니다. 비 활성화와 반대되는 활성화는 (2)번 함수"glEnableVertexAttribArray(handler.Attributes.TextureCoord);"가 쌍으로 있어야 합니다. (12) VBO 객체를 UnBind 합니다. Vertex Buffer Array 형태로 그려지는 렌더러와 충돌 하지 않도록 VBO를 해제해 줍니다. (13) 바인딩 했던 텍스쳐를 해제해 줍니다. glBindTexture(GL_TEXTURE_2D, 0);
(14) PixelLighting 쉐이더를 해제해 줍니다. glUseProgram(0);
4. 좀더 파고들기 추가적으로 이미지 뒤집기 기능을 좀더 정리해 보도록 하겠습니다. 이미지 뒤집기 API 정리 앞에서 언급했지만, 이미지 파일를 로딩한 후 raw data를 뒤집을 필요가 있습니다. 이때 이용하는 것이 Affine Transformation API 입니다. 일반적으로 아이폰에서는 다음과 같이 적용하면 됩니다. TextureDescription LoadImage(const string& file) { NSString* basePath = [NSString stringWithUTF8String:file.c_str()]; NSString* resourcePath = [[NSBundle mainBundle] resourcePath]; NSString* fullPath = [resourcePath stringByAppendingPathComponent:basePath]; UIImage* uiImage = [UIImage imageWithContentsOfFile:fullPath];
TextureDescription description; description.Size.x = CGImageGetWidth(uiImage.CGImage); description.Size.y = CGImageGetHeight(uiImage.CGImage); description.BitsPerComponent = 8; description.Format = TextureFormatRgba; description.MipCount = 1;
int bpp = description.BitsPerComponent / 2; int byteCount = description.Size.x * description.Size.y * bpp; unsigned char* data = (unsigned char*)calloc(byteCount, 1);
CGAffineTransform transform = CGAffineTransformIdentity; //if (flipImage) { transform = CGAffineTransformTranslate(transform, 0, description.Size.y); transform = CGAffineTransformScale(transform, 1.0, -1.0); } CGColorSpaceRef colorSpace = CGColorSpaceCreateDeviceRGB(); CGBitmapInfo bitmapInfo = kCGImageAlphaPremultipliedLast | kCGBitmapByteOrder32Big; CGContextRef context = CGBitmapContextCreate(data, description.Size.x, description.Size.y, description.BitsPerComponent, bpp * description.Size.x, colorSpace, bitmapInfo); CGContextConcatCTM(context, transform); CGColorSpaceRelease(colorSpace); CGRect rect = CGRectMake(0, 0, description.Size.x, description.Size.y); CGContextDrawImage(context, rect, uiImage.CGImage); CGContextRelease(context); m_imageData = [NSData dataWithBytesNoCopy:data length:byteCount freeWhenDone:YES]; return description; } 안드로이드에서는 다음과 같이 적용할 수 있습니다. com.myastro.gles.ResourceManager.java public ResourceManager(Context context, int res) {
// Get the texture from the Android resource directory
Bitmap bitmap = null;
InputStream is = context.getResources().openRawResource(res); try {
// BitmapFactory is an Android graphics utility for images
bitmap = BitmapFactory.decodeStream(is);
} finally {
//Always clear and close
try {
is.close();
is = null;
} catch (IOException e) {
}
}
// 비트맵 변환을 위한 행렬을 만든다.
Matrix mirrorMatrix = new Matrix(); // 행렬 좌표를 Y축으로 뒤집는다.
mirrorMatrix.preScale(1.0f, -1.0f); // 생성된 변환행렬을 이용해서 새로 bitmap을 생성한다. 속도는???
Bitmap tranformedBitmap = Bitmap.createBitmap(bitmap, 0, 0, bitmap.getWidth(), bitmap.getHeight(), mirrorMatrix, false);
bitmap.recycle();
if (tranformedBitmap != null) {
initBitmap(tranformedBitmap);
}
} 5. 결론 텍스쳐 적용하기를 다루면서 어떻게 정리할까 고민했는데, 대략적인 정리가 된것 같네요. 텍스쳐 장은 책에서 이미 많이 소개하고 있는 부분이어서 OpenGL 책을 보시는게 이해가 더 빠를 수도 있습니다. 여기에 정리된 사항은 책을 보고 만들어 보시고 이런 방식으로 ES2.0으로 적용도 가능 하다는 관점으로 보시면 좋을 것 같습니다. 또한 제가 정리한 방식은 최적화 되어 있지 않음으로 참조만 하시기 바랍니다. ^^; OGLES20 Template Application ported to mfc and android http://code.google.com/p/myastro/downloads/list http://code.google.com/p/myastro/downloads/detail?name=OGLES20Application.release.v.1.3.0.zip&can=2&q=#makechanges |


